
Key Highlights
- Drip edges are crucial components of roofing systems, especially for metal roofs.
- They effectively channel water away from the roof’s edge, safeguarding the fascia, soffit, and overall structure.
- Drip edges are typically crafted from durable materials like aluminum or galvanized steel, known for their resistance to rust and corrosion.
- Proper installation is essential for optimal performance, and seeking assistance from experienced roofing professionals is highly recommended.
- Regular inspection and maintenance of drip edges help extend their lifespan and ensure their continued effectiveness.
Introduction
When having a metal roof installed, understanding the significance of each component is important for a successful outcome. One such component, the drip edge, plays a vital role in protecting your home from potential water damage. This guide will cover the basics of metal roof drip edges, including their purpose, types, the installation process, and maintenance.
Understanding the Basics of Metal Roof Drip Edges
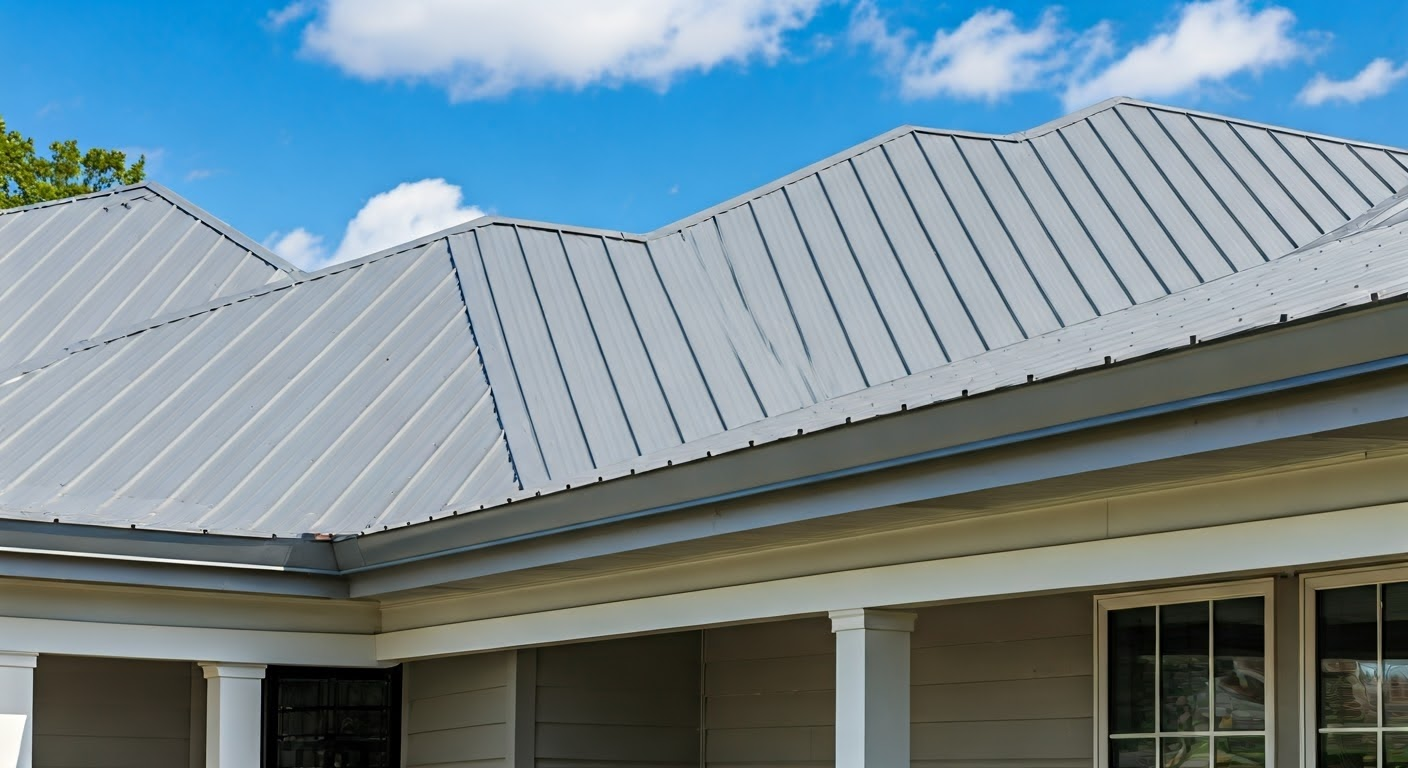
In the realm of roofing, where safeguarding your home from the elements reigns supreme, drip edges emerge as unsung heroes. These seemingly simple metal strips, meticulously installed along the edges of your roof, play a vital role in preserving the integrity of your house.
Serving as a first line of defense, drip edges expertly channel water away from the vulnerable edges of your roof, preventing it from infiltrating the underlying structure. This simple yet effective mechanism helps in preventing a cascade of potential problems, including rot, mold, and even structural damage.
Defining a Drip Edge and Its Importance
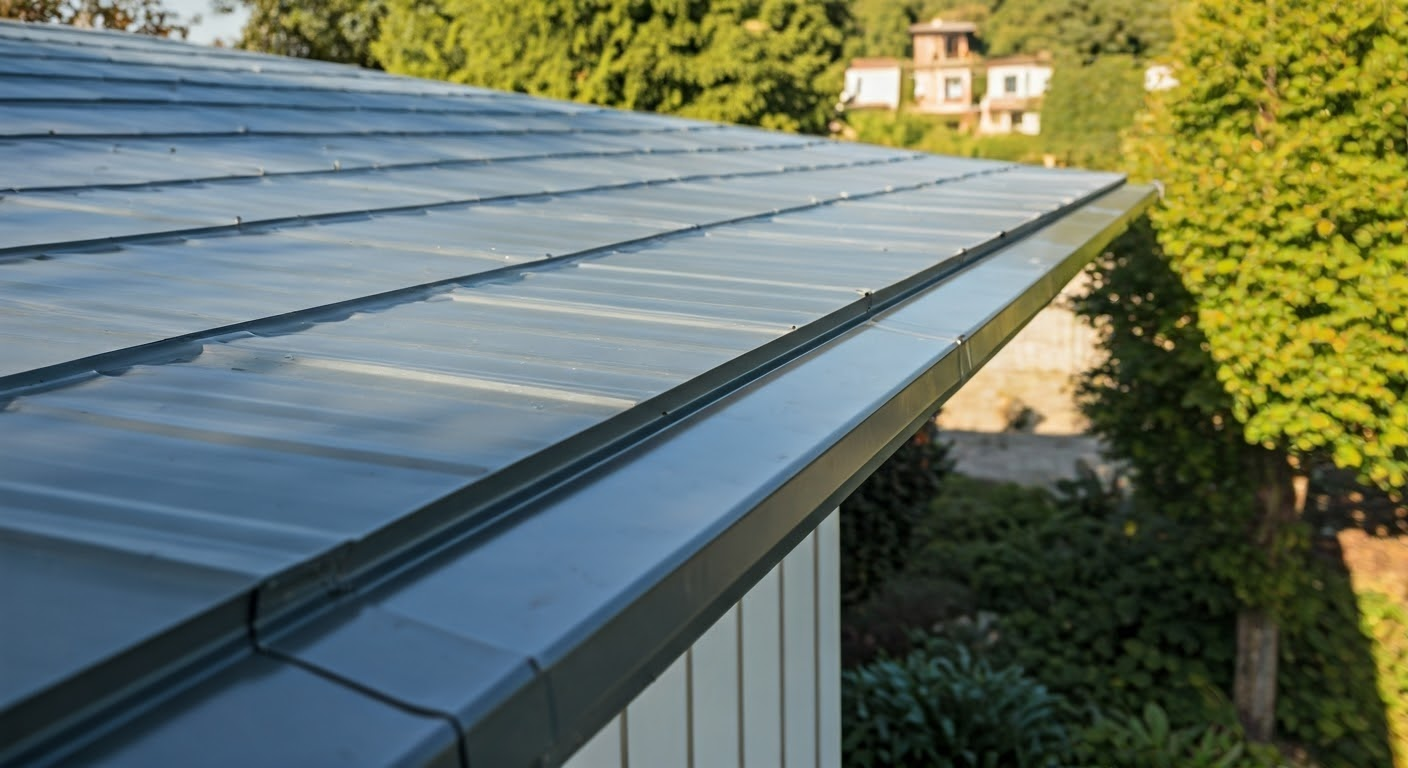
A drip edge is a metal flashing component installed along the roof edge, typically made from materials like aluminum or galvanized steel. It is an ‘L’-shaped metal strip that goes beneath the shingles or roofing material at the eaves and over the underlayment on the rake edges.
Its primary purpose is to direct water away from the fascia, which is the board that runs horizontally along the lower edge of the roof. Instead of water clinging to the fascia or seeping into the space between the roof and fascia board, the drip edge guides it downward to the gutters and away from your home’s foundation. This straightforward redirection safeguards your home by preventing water from infiltrating the structure, leading to costly repairs.
By diverting water away from the roof edge, drip edges protect the fascia, soffit, and the underlying rafters from potential damage caused by moisture. This protection extends the lifespan of your roof and prevents the growth of mold and mildew, safeguarding both your home’s structure and your family’s health.
How Drip Edges Protect Your Home in Mobile, AL-Pensacola (Ft. Walton Beach), FL
Drip edges, part of the essential drip edge flashing system, safeguard your home in Mobile, AL-Pensacola (Ft. Walton Beach), FL, by directing water away from the edge of the roof. This crucial component helps prevent water damage, ensuring the integrity of your metal roof and the rest of the home. By maintaining the good condition of the edge metal and fascia board, drip edges effectively mitigate water infiltration and protect against potential deterioration, ultimately keeping your property secure and free from exterior threats and moisture infiltration.
The Role of Drip Edges in Roofing System Longevity
While often overlooked, drip edges are essential for maximizing the lifespan of a roofing system, proving their worth over time. By preventing water damage, they indirectly contribute to the longevity of the entire roof.
The protective barrier created by a drip edge safeguards the underlying roof deck, preventing moisture from penetrating and causing rot or decay. Consequently, this small metal flashing can significantly impact the lifespan of your roof, saving you from potential headaches and costly repairs.
Preventing Water Damage and Ensuring Proper Drainage
Water is a powerful force, and even small amounts of water infiltration can cause significant damage over time. Drip edge flashing is a crucial component in mitigating the risk of water damage by effectively channeling runoff away from vulnerable areas.
The roof drip edge guides water from the roof’s edge into the gutters, ensuring proper drainage and preventing water from seeping into the fascia, soffit, and underlying structure. This protection is especially important during heavy rain or snowmelt, where water volume can be substantial.
Without drip edges, water can pool on the roof or back up under the shingles, leading to leaks, rot, mold growth, and compromising the structural integrity of your home. Investing in drip edges is an investment in protecting your home.
Enhancing the Aesthetic Appeal of Your Roof
While the primary function of drip edges is to protect your roof from water damage, they also contribute to the aesthetic appeal of metal roofing. By providing a finished look, drip edges enhance the clean lines and modern aesthetics of metal roofs, increasing curb appeal.
A well-installed drip edge conceals the raw edge of your roof, creating a more polished and professional appearance. This visual appeal can significantly impact your home’s exterior, making it more attractive and increasing its value.
Furthermore, drip edges are available in various colors and materials to complement different metal roofing styles and colors. Homeowners can choose drip edges that perfectly match their roof, creating a cohesive and visually appealing design.
Types of Drip Edges for Metal Roofs
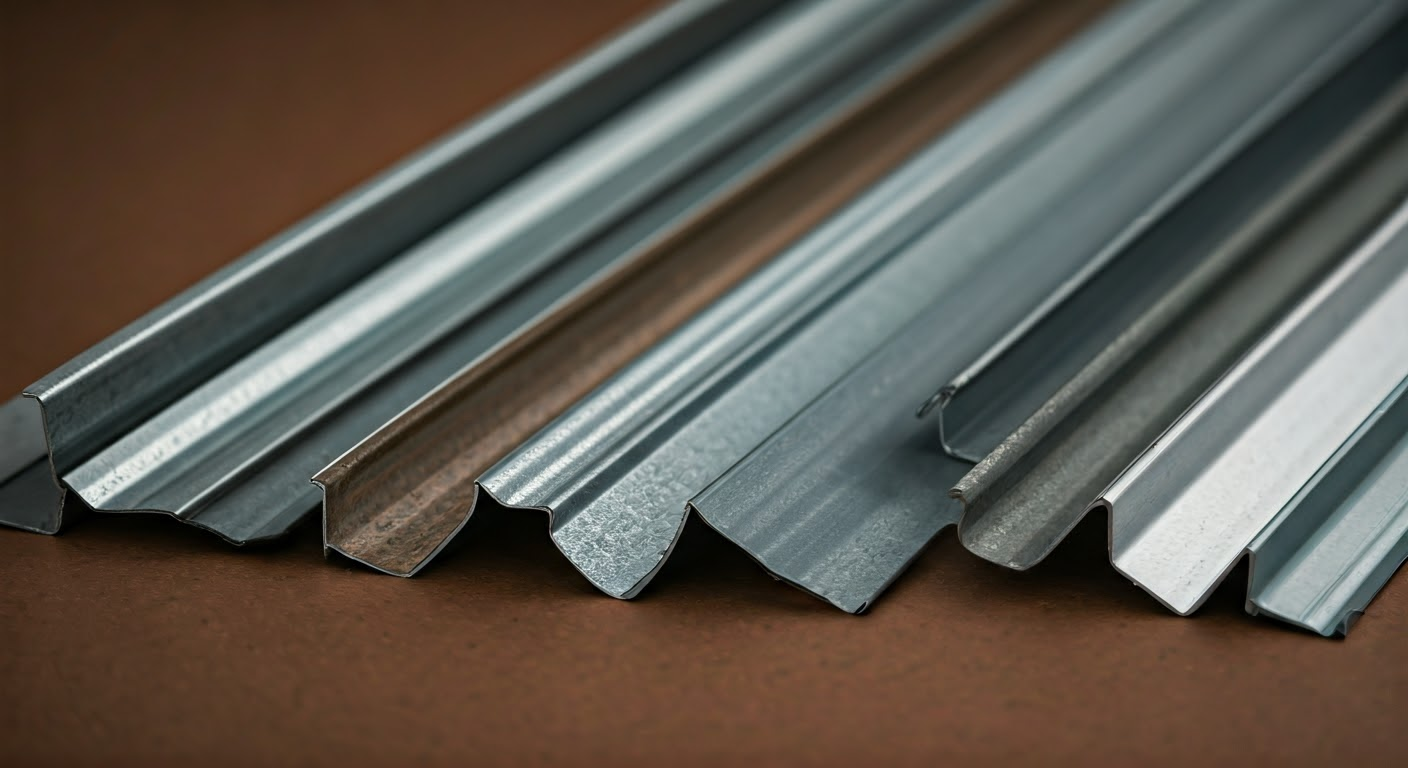
Different roof designs and structures necessitate specific drip edge types. The most common types of drip edges are “C” style and “D” style, each serving the same purpose but with slight variations.
“C” style drip edges have an “L” shape, offering a simple yet effective solution for most roofs, while “D” style drip edges, shaped like a “T,” provide a wider coverage area, making them ideal for roofs with a steeper pitch.
Materials Used in Drip Edges: Pros and Cons
The type of metal used for your drip edge can affect its durability, lifespan, and overall performance. Consider your budget and the specific needs of your roof when selecting a drip edge material.
Aluminum and galvanized steel are the most popular materials for drip edges. Aluminum is lightweight, corrosion-resistant, and cost-effective, while galvanized steel is exceptionally durable and can withstand harsh weather conditions. While less common, copper is another option that provides a distinctive aesthetic appeal but comes at a higher price point.
| Drip Edge Material | Pros | Cons |
|---|---|---|
| Aluminum | Lightweight, corrosion-resistant, affordable | Less durable than galvanized steel |
| Galvanized Steel | Extremely durable, long lifespan | Heavier than aluminum |
| Copper | Elegant appearance, durable | More expensive |
Choosing the Right Drip Edge Profile for Your Roof
Selecting the appropriate drip edge profile for your new roof is crucial. Consulting your local building code ensures compliance with regulations and choosing the correct profile for optimal roof protection.
For instance, a T-shaped drip edge, also known as a “Type D” drip edge, effectively diverts water away from the fascia and into the gutters, particularly on the rake edge. The rake edge, which runs vertically along the gable ends of your roof, is particularly susceptible to wind-driven rain.
Furthermore, if your new roof has a steeper pitch, a wider drip edge might be necessary to accommodate a higher volume of water runoff. Consulting with a professional roofing contractor can help you determine the best options.
Installation Guide for Metal Roof Drip Edges
Proper installation is crucial for the effectiveness and longevity of your drip edges. While it can be a DIY project for those with experience, hiring a professional roofing contractor for the installation process is highly recommended, especially if you’re installing a new metal roof.
A professional roofer possesses the skills, tools, and expertise to ensure the drip edges are correctly installed, providing optimal protection. The process usually involves measuring the roof edges, cutting the drip edge to size, and fastening it to the roof deck with nails or screws while maintaining proper overlap at the joints.
Step-by-Step Installation Process
Although it’s advisable to hire a professional for metal roof installation, understanding the process offers valuable insights. Here’s a simplified step-by-step guide:
- Eave Installation: Start by installing the drip edge along the eaves (horizontal bottom edges) first. Overlap each piece by at least an inch to prevent leaks. Secure the drip edge using roofing nails, ensuring a tight fit against the decking board beneath your metal panels.
- Rake Edge Installation: Next, install the drip edge along the rake edges (sloped sides) of the roof. The drip edge should overlap the eave drip edge at the corners, ensuring a watertight seal. Use roofing nails to secure the drip edge to the fascia board.
- Sealing and Finishing: Once all drip edges are in place, apply a sealant along the inside edges of the drip edge where it meets the roof deck. This step creates an additional barrier against water intrusion.
Common Mistakes to Avoid During Installation
Ensuring a successful and long-lasting installation requires being aware of the pitfalls. Here are some common mistakes to avoid during drip edge installation:
- Inadequate Overlap: Insufficient overlap between drip edge pieces creates gaps where water can penetrate. It’s a good idea to strictly maintain an overlap of at least one inch for a watertight seal, crucial for the integrity of the system.
- Improper Fastening: Using the wrong type or size of fasteners can weaken the drip edge’s hold, potentially leading to loosening or detachment over time. Use the recommended fasteners to secure the integrity of the installation and ensure its effectiveness.
- Ignoring Local Building Codes: Building codes often stipulate specific requirements for drip edge installation, like using corrosion-resistant materials and ensuring proper flashing techniques. Complying with these codes is crucial to avoid jeopardizing your roof’s warranty and meet safety standards.
Maintenance and Troubleshooting for Drip Edges
Similar to any other exterior element of your home, drip edges require maintenance for them to function effectively and last longer. Luckily, maintaining them is relatively low-maintenance and straightforward, saving you potential headaches down the line.
Regularly inspect your drip edges for signs of damage, rust, or debris buildup, especially after severe weather. Remove any leaves, branches, or other debris to ensure water flows freely through the system. Address any signs of damage immediately to prevent potential leaks and maintain the good condition of your roof.
Routine Maintenance Tips
Keeping your drip edges in good condition is an important aspect of overall roof maintenance. Just like the rest of the home, regular maintenance can significantly extend your drip edge’s lifespan.
Here are some maintenance tips to ensure their effectiveness:
- Regular Inspections: Inspect your drip edges at least twice a year, preferably during spring and fall. Look for signs of damage, such as rust, dents, or loose fasteners, and address them promptly.
- Clear Debris: During your inspections, clear away any leaves, twigs, or debris that may have accumulated in the drip edges. This buildup can trap water, leading to potential damage and compromising the system’s effectiveness.
- Check for Sealant Integrity: If sealant was used during installation, ensure it is still intact and in good condition. Reapply sealant if necessary to maintain a watertight barrier.
Identifying and Fixing Common Issues
Timely troubleshooting can save you from expensive repairs and ensure your drip edges continue to function effectively. Here’s a look at common issues:
Rust and corrosion are common issues, especially in coastal areas. If you notice rust on your drip edges, it’s essential to address it promptly to prevent further damage. You can use a wire brush to remove the rust, prime the affected area, and repaint it with rust-resistant paint.
Another common issue is sealant failure. Over time, the sealant used to seal the drip edge can crack or deteriorate, creating gaps that allow water to seep in. Inspect the sealant regularly and reapply it as needed to maintain a watertight seal. Addressing these common issues swiftly effectively prevents water damage and ensures that your drip edges continue to shield your home.
Conclusion
Metal roof drip edges play a crucial role in safeguarding your home’s structural integrity and enhancing its visual appeal. By understanding the basics, types, and proper installation techniques, you can prevent water damage and ensure efficient drainage. Regular maintenance is essential to address common issues and prolong the longevity of your roofing system. Whether you opt for a T-style or L-style drip edge, choosing the right profile is key. For expert guidance on selecting and installing the ideal metal roof drip edge for your property in Mobile, AL-Pensacola (Ft. Walton Beach), FL, contact us today for a consultation.
At Metal Roof Mobile AL, we ensure our clients receive the best possible outcomes. Our commitment to quality workmanship and customer satisfaction is unwavering, making us the top choice for residential Roofing services in our community.